Shelter is one of the key requirements for successful survival, and securing it will greatly improve your situation in the wild. A simple lean-to not only provides protection from wind and rain, but can also act as a shield to help trap heat and keep you warm. Keep in mind, lean-tos are also beneficial in hot climates, when you need to be protected from dehydrating direct sunlight or windy conditions. Basic lean-to structures consist of two support poles, a ridge pole, and several roof poles. Insulating material is then packed onto the roof to help deflect the elements. To help speed up your build, consider using the low branches of existing trees as support poles and tarps or emergency blankets as coverage for your roof. With a hot fire placed just outside the open end of your lean-to, the roof should help contain the heat so you stay warm and dry on emergency overnights.
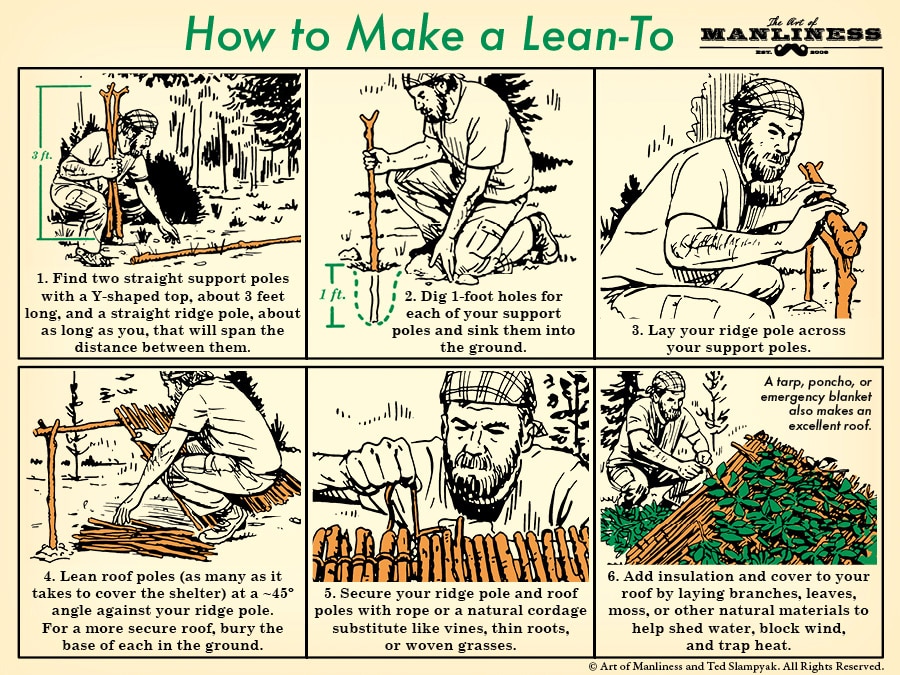
1: Find two straight support poles with a Y-shaped top, about 3 feet long, and a straight ridge pole, about as long as you, that will span the distance between them.
2: Dig 1-foot holes for each of your support poles and sink them into the ground.
3: Lay your ridge pole across your support poles.
4: Lean roof poles (as many as it takes to cover the shelter) at a~45ْ angle against your ridge pole. For a more secure roof, bury the base of each in the ground.
5: Secure your ridge pole and roof poles with rope or natural cordage substitute like vines, thin roots, or woven grasses.
6: Add insulation and cover to your roof by laying branches, leaves, moss, or other natural materials to help shed water, block wind, and trap heat.
Like this illustrated guide? Then you’re going to love our book The Illustrated Art of Manliness! Pick up a copy on Amazon.